Template Settings Interface:
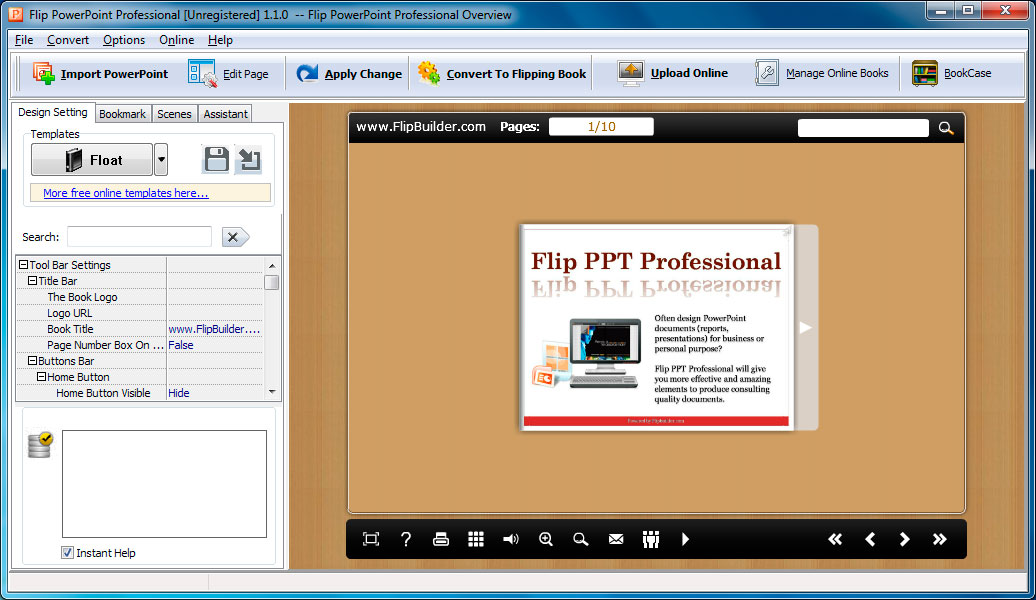
After importing PPT, you will see the main Template Design and Preview interface. Four tabs in the design panel for you to design template, choose scene, define bookmark and edit content for assistant.
1. Design Setting
2. Scene Setting
3. Bookmark Editing
4. Assistant Setting
5. Other Settings
1. Design Setting:
The design setting interface contains below main parts:
Choose Template, Tool Bars Settings, Flash Display Settings and Flash Control Settings.
(1). Choose Template
Although you have selected template before importing PPT, you can also change to other templates. Just click ![]() icon to select templates from Template Selection interface, or download Online Templates to use.
icon to select templates from Template Selection interface, or download Online Templates to use.
![]() Click this icon is to save current settings as a TXT file for later uses;
Click this icon is to save current settings as a TXT file for later uses;
![]() Click this icon is to import stored setting file at once.
Click this icon is to import stored setting file at once.
There are 4 different templates at present: Classical, Float, Neat and Spread. You can also click "Online Templates" to install more templates to use. Each template contains some unique settings.
More templates and themes online: http://www.flipbuilder.com/templates-themes/ .
(2). Tool Bar Settings
i. Title Bar (only in Float template)
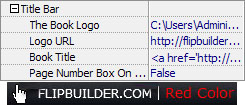
Customize book title and logo for showing on the top of your flipbook. You are enabled to set the book title as HTML format text. For example: <a href='http://www.flipbuilder.com' target='_blank'>FLIPBUILDER.COM</a> | <font color='#ff0000' size='14'>Red Color</font>
ii. Buttons Bar
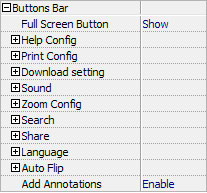
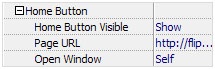
Home Button
You can add a home button![]() to help reader to click and go to your website directly:
to help reader to click and go to your website directly:
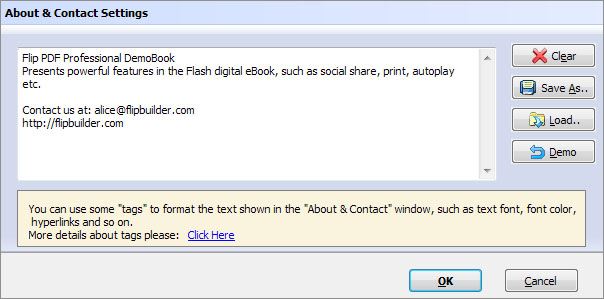
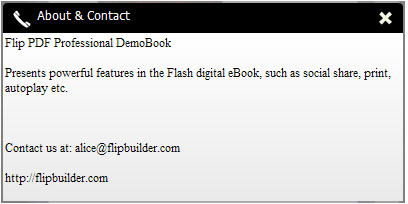
About Button
Add About button ![]() to show the author, contact, book, company info:
to show the author, contact, book, company info:
![]()
Click "…" to enter into "About & Contact" edit interface:
After clicking the About button, you will view the About window by clicking the button:
Full Screen Button
To enable "Full Screen" functionality in output flipbook, select "Show" in "Full Screen Button" option:
![]()
Then you can click icon![]() to view flipbook in Full Screen, click icon
to view flipbook in Full Screen, click icon![]() or "Esc" button to exit from the Full Screen.
or "Esc" button to exit from the Full Screen.
Or if you want to show your flipbook without Tool Bar while showing in Full Screen mode, you can set "No" in "Full Screen without Tool Bar" (just in Classical Template):
![]()
Help Config
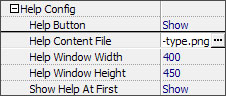
To show tips about viewing flipbook, you can set "Show" in "Help Button" option, and you can define Help Content manually by inserting "Help Content File (image or SWF)", also enable to define the Width and Height of the Help image or swf. If you set "Book->Retain the book to center->No", you can set "Show Help At First->Show" to display the Help Panel with the Book as below:
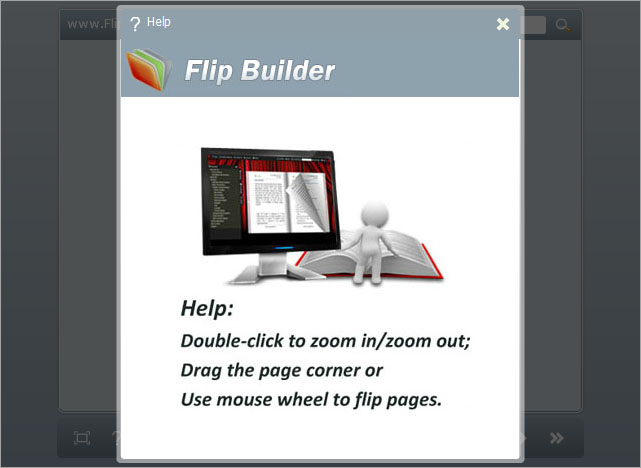
You can also click the button![]() to view the same Help page in pop-up window.
to view the same Help page in pop-up window.
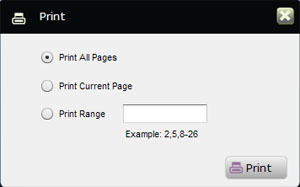
Print Config
![]()
Choose "Yes" in "Print Enable", then click icon![]() to set print page range as below:
to set print page range as below:
You can also click "Print Watermark File->…" button to choose image or SWF file from your computer as watermark on printed out pages.
Download Setting
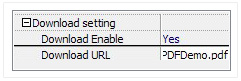
If you want your flipbook readers to download the PPT file or the flipbook directly from your website, select "Yes" in "Download Enable" option, then input the Download URL directly, you can use absolute path like "http://www.flipbuilder.com/flip-PPT/example/files/download/FlipPPTDemo.PPT" or relative path like "/files/download/FlipPPTDemo.PPT" (make sure you have uploaded the PPT to the same path).
Then readers can click the icon![]() to download your uploaded PPT file directly.
to download your uploaded PPT file directly.
Sound
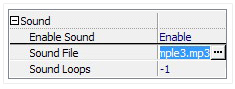
If you want to add background sound to your flipbook, such as a song or other audio file, set "Enable Sound->Enable", then click " " icon to choose "Sound File" from your computer, then set "Sound Loops", "-1" stands for playing the sound file all the time while viewing flipbook, other value (N>0) stands for the times of playing the sound file.
Zoom Config
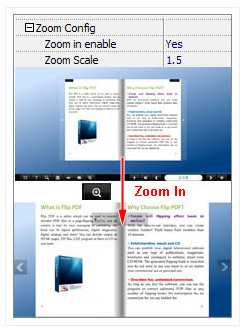
To Enable Zoon In functionality, choose ''Yes" in "Zoon in enable", then set "Zoom Scale", the value is the times between zoomed page size and the current page size.
In Float template, you don't need to set Zoom Scale, you can adjust more conveniently by the zoom in tool like this:
![]()
You can also set "Scroll with mouse->Yes" to scroll zoom in page while moving mouse.
Search
![]()
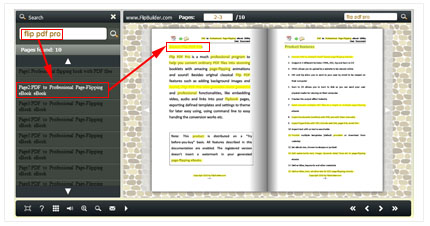
Select "Show" in "Search Button" (make sure you have check "Enable Search" option in "Import PPT" interface), then define "Search Highlight Color", after clicking "Search" icon ![]() , you will see a popup box to input search words, then click Enter or "Search" button, you will get the below searching result:
, you will see a popup box to input search words, then click Enter or "Search" button, you will get the below searching result:
Share
![]()
You can share via emails, or just through Facebook, Twitter, Google, etc..
a. Share Button
If you want readers to share via Email, you can enable "Share" feature as below shows:

When the viewers click the share button ![]() , they will enter into the Email interface with the link of your flipbook in the Email body.
, they will enter into the Email interface with the link of your flipbook in the Email body.
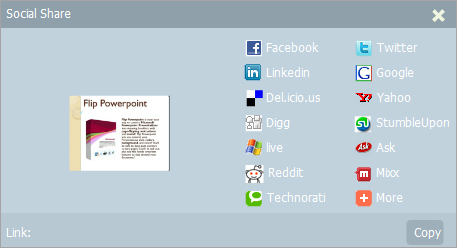
b. Social Share
If you want your flipbook viewers to send the link to their friends or clients via Facebook, Twitter, Linkedin, Google, Yahoo and so on, you can add a Social Share button in your flipbook for readers to send out your flipbook link immediately:
![]()
The readers just need to click the "Social Share" button ![]() , then the below window will pop up for them to choose share channel:
, then the below window will pop up for them to choose share channel:
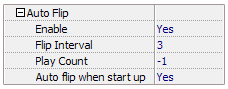
Auto Flip
To auto flip your eBooks, you can set "Yes" in "Auto Flip->Enable" option; then define the Flip Interval (seconds of staying on each page); the value of "Play Count" stands for the times of auto playing the eBook, and "-1" stands for playing forever (after clicking the Auto Flip button ![]() , the flipbooks will be flipped by staying 3 seconds per page); if you want to auto start and flip the eBook after opening, just set "Auto flip when start up->Yes":
, the flipbooks will be flipped by staying 3 seconds per page); if you want to auto start and flip the eBook after opening, just set "Auto flip when start up->Yes":
Thumbnail Button
![]()
Show Thumbnail Button ![]() (set "Enable") to view page thumbnails of your book, or you can Disable it to hide the button.
(set "Enable") to view page thumbnails of your book, or you can Disable it to hide the button.
Single Page
![]()
If your book contains landscape pages, or the page content is different to read for the font is too small, you can set "Single Page->Enable" to enable readers to click "Single Page" icon![]() to view pages one after another, then click "Double Page" icon
to view pages one after another, then click "Double Page" icon![]() to back to the normal book reading mode.
to back to the normal book reading mode.
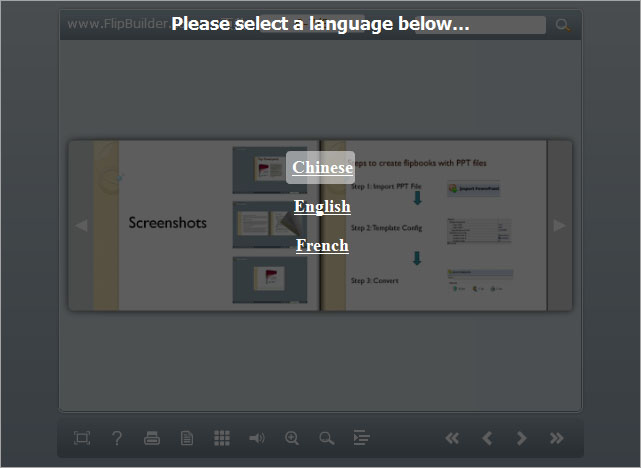
Language
![]()
You can set language for showing tools or tips in your created flipbook, click "…" to enter into "Language Settings" interface. You can choose two or more language to use, just check "Switchable" option, then users can click "Switch Language" button![]() to choose their prefer language for tips:
to choose their prefer language for tips:
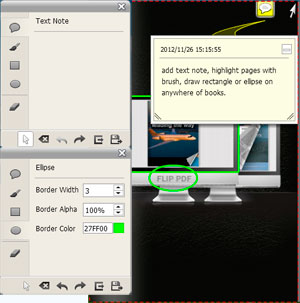
Add Annotations
To help readers take notes on your books while reading, you can set "Add Annotation->Enable". When readers view your book on computer, they can click "Add Annotation" icon![]() to add text note, highlight pages with brush, draw rectangle or ellipse on anywhere of your book pages. If they open the book next time, they can view the comments, or delete as they want:
to add text note, highlight pages with brush, draw rectangle or ellipse on anywhere of your book pages. If they open the book next time, they can view the comments, or delete as they want:
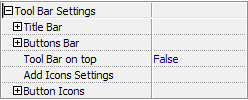
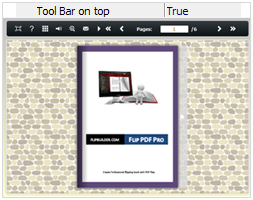
iii. Tool Bar on Top (only in Float template)
If you want to place the toolbar in Float templates on the top of the flash eBook, you can set "Tool Bar on Top" as "True":
iv. Add Icons Settings
If you want to add some other kinds of buttons which the program doesn't provide, you can click "Add Icons Settings->…" to enter into "Icons Settings" interface to add new icons on tool bar:
![]()
You can define the link action as "Go to page", or open an online webpage, or even "Call Javascript function" to carry out your wanted interactive functionalities via defining Javascript function yourself.. After your "Apply Change", the new added icon will show in the toolbar. (More details about Call Javascript function will be introduced in the part of "Edit Page->Add Link".)
v. Button Icons
Define settings for the icons of the buttons:
![]()
Icon Color
![]()
Icon File
Select the Tool Bar Button to replace with your own icon.
![]()
More details please view here: http://www.flipbuilder.com/support/how-to-replace-icons-on-flash-toolbar.htm .
(3). Flash Display settings:
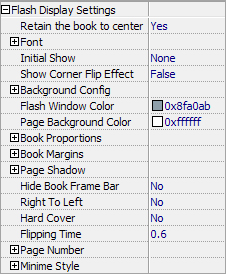
i. Retain the book to center
![]()
If you select “No” in this option, the eBook will be shown on the right-side. This setting is for embedding special background image, such as advertisement or company log.
ii. Pages per thickness (only in Neat template)
To create more real life like ebook, you can set Pages per thickness, which means how many pages to show a distinguishable thickness. The smaller value set, the thicker your book. If the value is smaller than 0, or larger than the total page number of your book, it won't show any thickness. And on the book edge, you will see different page number tips for you to click and go to that page directly:
iii. Background Alpha
![]()
Set the value (0-1) of alpha to control the transparence of the background in flip book. For example, you can set the value as 0 to make the book background as transparent completely, when you embed the book in other HTML page, it will show the background of that HTML only.
iv. Show Corner Flip Effect
Show the Corner Flip Effect at the beginning to tell readers that they can drag or click the corner to turn pages directly.

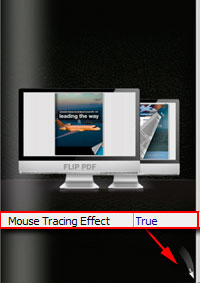
v. Mouse Tracing Effect
Show Mouse Tracing Effect at the beginning to tell readers that they can drag or click the corner to turn page. If the book is set to open with double page spread, then the Mouse Tracing Effect won't work.
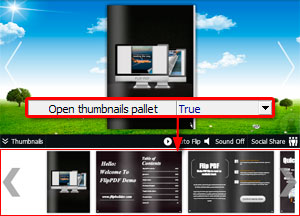
vi. Open thumbnails pallet
Define whether the thumbnail pallet open or not when you arrive on the book.
vii. Font
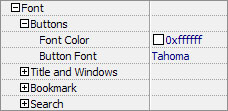
If you want to change fonts of toolbar buttons, flash windows even bookmarks or search result panel, you can set font types and colors in Font Panel.
viii. Initial Show (set in Float/ Spread templates)
You can show Bookmark panel or Thumbnails panel on the flash page at the beginning, just select "Bookmark" or "Thumbnails" in this option.
For Example, select "Thumbnails":
![]()
Then you will get flipbook shown with below initial interface:
ix. Background Config
Background Color:
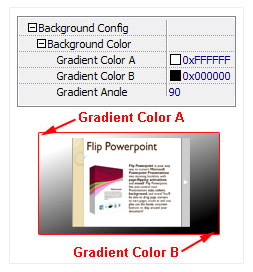
Define background for your flipbook with gradient color or pure color (the same color for "Gradient Color A" and "Gradient Color B"). Gradient Angle is the angle between the two colors.
Background Image (set in Classical and Spread templates):
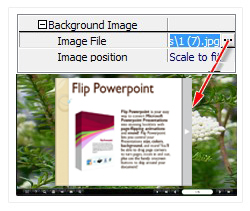
Click the icon " " to choose background image from your computer, and there are 11 kinds of "Image Position" for you to choose: Scale to fit, Fill, Top Left, Top Center, Top Right, Middle Left, Middle Center, Middle Right, Bottom Left, Bottom Center and Bottom Right.
Background Image (set in Float template):

The Float template enables you to add two background images: Outer Image and Inner Image. You can make Inner background image to show special information, such as advertisement or company logo, etc. There are also 11 kinds of "Image Position" for you to choose: Scale to fit, Fill, Top Left, Top Center, Top Right, Middle Left, Middle Center, Middle Right, Bottom Left, Bottom Center and Bottom Right.
x. Flash Window Color
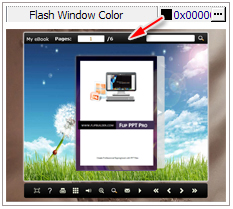
This color will be applied on all flash windows, such as the book window, "Help" window, "Print" window and so on.
xi. Page Background Color

When load pages, or if the page number of your PPT file is odd, then the page (the last page) will show with the "Page Background Color".
xii. Book Proportions
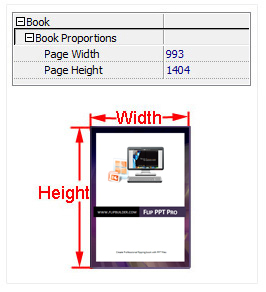
Please note that the values are not fixed in pixels or inches, they just represent a ratio for "Page Width: Page Height", and the book size will be changed depend on your Explorer Window Size.
xiii. Book Margins
Book Margin (set in Classical Template):
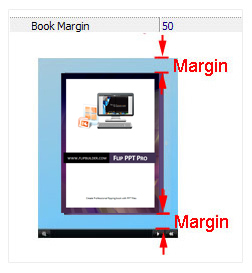
"Book Margin" refers to the distance between the book and the toolbar.
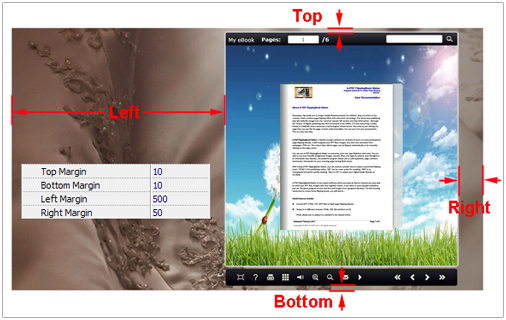
Top/ Bottom/ Left/ Right Margin (set in Float/ Spread Template):
xiv.Page Shadow
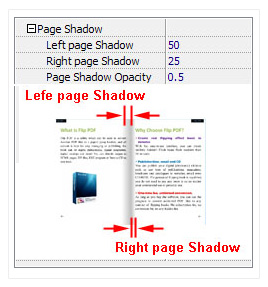
The value also takes the value of Book Proportions as reference, and the value interval of "Page Shadow Opacity" is "0~1", the larger value refers to the deeper shadow color.
xv. Hide Book Frame Bar
![]()
If don’t want to show the book frame bar, choose “Yes” in this option.
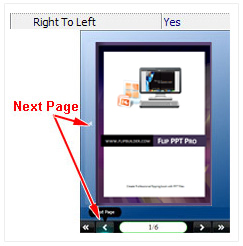
xvi. Right to Left
If the language of your file is read from right to left (such as Arabic), then choose "Yes" in "Right to Left" option:
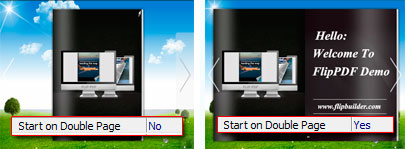
xvii. Start on Double Page
Open your book in double-page spread or not. "Yes" means open book without cover, presenting first two pages at a time. If you have odd number pages, you can set this option as "Yes".
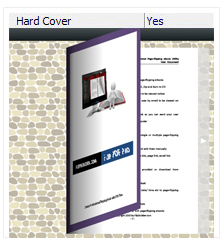
xviii. Hard Cover
If you want create hard cover effect (a book bound with rigid protective covers) for your flipbook, choose "Yes" in "Hard Cover" option:
xix. Flipping time
![]()
Sets page flipping time in seconds according to your needs. (Recommended second value is 0.6)
xx. Mouse Wheel to Turn page
![]()
Enable or Disable turning page with mouse wheel.
xxi. Page Number
If you don't want to count in the cover page, table of contents pages into the actual page numbers, you can set "Start Page Numbering (Roman)" and "Start Page Numbering (Arabic)". For example, the first 3 pages are Table of Content pages with Roman page numbers, and set Arabic page numbers from page 4, then you will get page number box like below:

xxii. Minime Style
If you want to present Page-flipping eBook pages directly without showing toolbar, especially when you want to embed eBook into a small area in existing webpages, then you can use this "Minime Style":
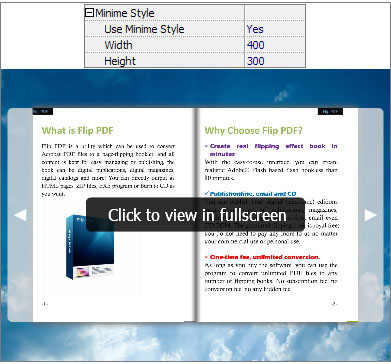
The Minime Style will trigger when the Width or Height of the Flash Container is less than the defined value. You can also always show the page-flipping eBook in Minime Style with adding a parameter to your URL like this: www.yourdomain.com/?alwaysMinimeStyle=true
(4). Flash Control Settings:
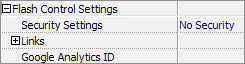
i. Security Settings
![]()
If you want to protect your flash books with passwords, you can click "…" icon to enter into "Flash Security Config" interface:
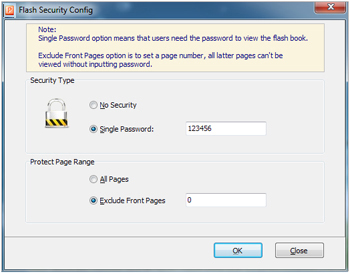
Select "Security Type->Single Password", and input passwords into the box (there is no restriction on password format at present). You can also set "Protect Page Range" as "All Pages" or the latter pages after a defined page number. (Tips: The program utilize RC4 algorithm to protect eBook pages, the eBook content pages will show nothing without permission.)
ii. Links
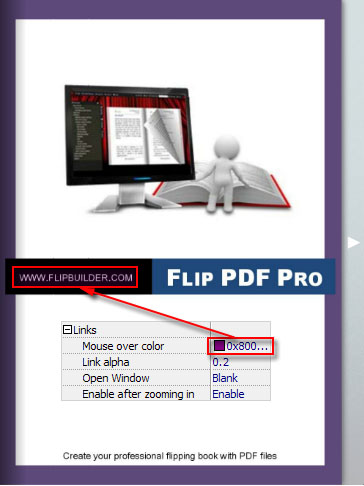
If you have check "Import links" option in "Import PPT" interface, or add links in "Edit Page" interface, then you can define settings here, choose "Mouse over color", "Link alpha" (refers to the link area opacity, value interval: 0~1, "0" stands for the area is totally transparent), and "Open Window->Blank/ Self". The links also can be clicked after zooming by setting "Enable after Zooming in->Enable".
iii. Google Analytics
![]()
In the HTML output format, you can add statistics by using google analytics. You can get more information about Google Analytics ID from http://www.google.com/analytics/ .
2. Scenes Setting:
To make your book more attractive and lively, you can apply animated background which called "Scene" in the flip program. There are many pre-designed scenes for you to choose and use directly, such as Autumn Leaves, Beach Beauty, Desert, Moon, Underwater World, Grassland, Snow, Clouds, etc.
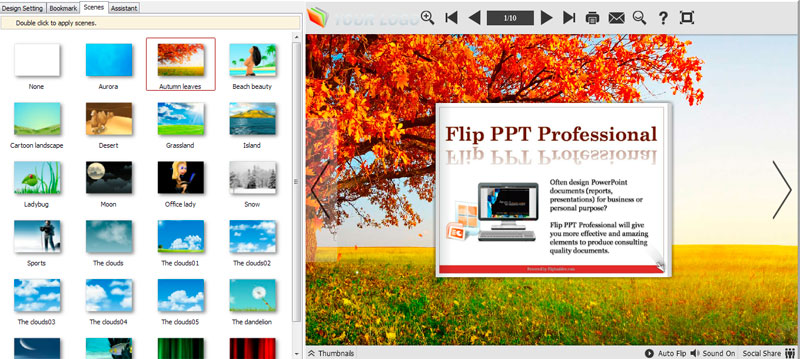
Just double-click to apply the scenes, or you can set your own style scene by setting "SWF" format background image in "Design Setting" part.
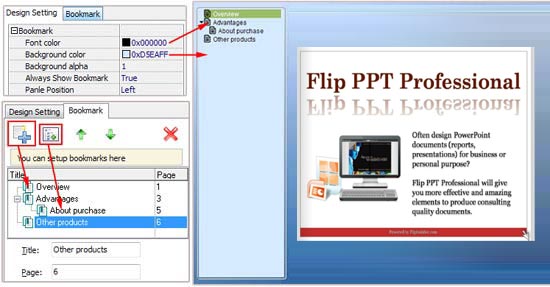
3. Bookmark Editing:
You can check "Import Bookmarks" option in Import PPT interface if your PPT contains bookmarks, or you can edit bookmarks directly in the program. In Classical Template, you can even define bookmark font color, background color, position, etc.:
4. Assistant Setting:
If you want to provide sound or text tips for pages of your books, you can enable the Assistant Feature, edit scrolling text, record audio or insert sound directly. Then readers can following your tips, listen to the audio you applied, get more interest and info from your book.
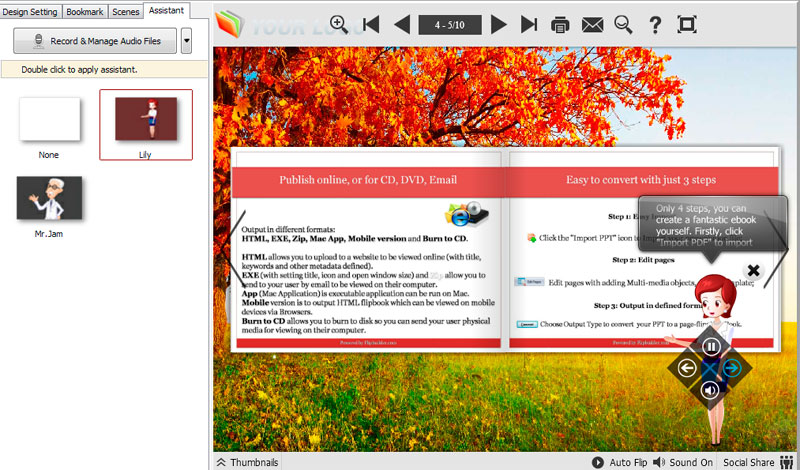
Click "Record & Manage Audio Files" icon![]() to enter into Record Audio interface:
to enter into Record Audio interface:
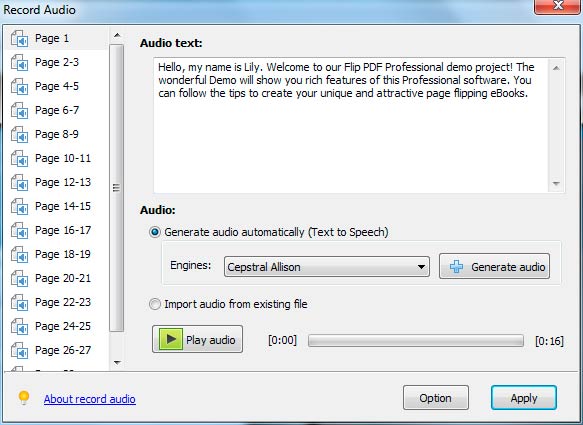
Input "Audio Text" for each page, and then choose Text-to-Speech engine, and then click "Generate audio". After generating, you can click "Play audio" to listen to the audio, you can also choose "Import audio from existing file" to apply existing audio directly.
About Text-to-Speech engine install and use, you can view details in this page: http://www.flipbuilder.com/support/how-to-read-your-text-to-readers-in-flipping-book.htm .
5. Other Settings:
(1). Export Theme
If you want to save the current template settings as your own style template for later uses, you can click "File->Export current settings as Theme" button to storing all current template settings, include the background images, margin values, toolbar buttons and so on.
Then when you want to use later, just click "File->Import Themes", the theme will be added to the templates selecting interface.
Download more themes from FlipBuilder now: http://www.flipbuilder.com/templates-themes/ .
(2). Application Options
Pages Quality and Size for Mobile Version
Five types of "Pages Quality And Size" for mobile version eBooks:

Mobile Template
The current version provides two mobile template modes for you to use: Slide and Single Page Flip. The later one adds page-flipping effect on the pages while viewing in mobiles.
At last, click "Apply Change" icon  to apply the settings (You won't preview the applied effect before clicking this icon).